
Ray Tracing for PHYSICS AND THE VISUAL ARTS
Ray tracing with mirrors
The geometrical procedure for locating the image produced by a spherical mirror is straightforward.
As you read these steps, follow along with the aid of Fig. 1.
A. Select an appropriate scale and mark the position of the object and the mirror on the
optical axis, as shown.
B. Draw a line MM' through the center of the mirror and perpendicular to the optical axis.
C. Mark the focal point F of the mirror at f = R/2 on the optical axis and locate the object
on the axis, all to the same scale.
D. Draw the following rays to locate the image. As with lenses, any two of these reflected
rays are sufficient to locate the image position at their intersection, but you should always draw
the third ray as a check.
1. Ray 1 is drawn from the object through the center of curvature. It reflects back along itself
upon striking the mirror.
2. Ray 2 is drawn parallel to the optical axis from the object to the mirror (MM'), where it is
reflected through the focal point of a concave mirror or from the focal point of a convex mirror.
3. Ray 3 is drawn from the object to the mirror (MM') along a path through or toward the focal point
and is reflected parallel to the optical axis.
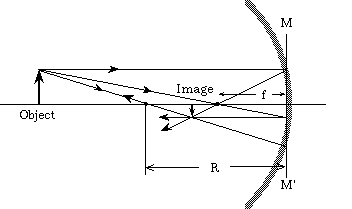 Fig. 1.
E. If the reflected rays converge on the same side as the incident light, the image is real
and is located at the intersection of these three rays. If the reflected rays diverge, the image is
virtual and is located where these three rays appear to originate. You can measure the position and
image height directly from the scale drawing.
Ray tracing with thin lenses
Let us state the graphical procedure to follow for locating the image from a given lens when you
know the object's position. You should refer to both parts of Fig. 2 as you read these steps.
A. Select an appropriate scale (meters, centimeters, etc.) and mark the position of the lens
on the optical axis.
B. Draw a line LL' through the center of the lens and perpendicular to the optical axis, as
shown. This line will replace the actual lens surfaces that refract the light.
C. Mark the focal points F of the lens on the optical axis and locate the object on the axis,
all to the same scale. (In problems of this sort, you will ordinarily be given the focal length f of
the lens.)
D. Draw the following rays. Any two of these rays are sufficient to locate the image, but you
should always draw the third ray as a check.
1. Draw ray 1 parallel to the optical axis from the object to the line LL' (the lens). For a
converging lens, extend this ray from LL' through the focal point on the side opposite the
incident light. For a diverging lens, extend the ray from LL' as though the ray came from the
focal point on the same side as the incident light.
2. Draw ray 2 from the object to the line LL', passing through a focal point. For a converging
lens, draw ray 2 through the focal point on the same side as the incident light; for a diverging
lens, draw ray 2 in the direction of the focal point on the opposite side. In both cases, continue
the ray from LL' parallel to the optical axis.
3. Draw ray 3 from the object to line LL' at the center of the lens and continue it undeviated.
E. If the rays converge on the side opposite the incident light, the image is real and is
located at the intersection of these three rays. If the rays diverge, the image is virtual and is
located where these three rays appear to originate. You can measure the position and image height
directly from the scale drawing.
 Fig. 2.
Back to PHYS 153 Home
Back to Physics Department
Back to USC Homepage
Maintained by:rjones@mail.psc.sc.edu
Last Modified: 09/05/02